


DJI Mavic Mini Rear Left Arm with Motor
₹3,900.00 Original price was: ₹3,900.00.₹2,799.00Current price is: ₹2,799.00. inc. Gst
- Drone Compatibility – Tailor-made for DJI Mavic Mini
- Material Type – Sturdy plastic with integrated metal motor parts
- Lightweight – Weighs approximately 15 grams
- Motor Included – Pre-installed brushless motor
- Motor Rotation – Clockwise (CW) direction
- Color Finish – Matches original Mavic Mini aesthetic
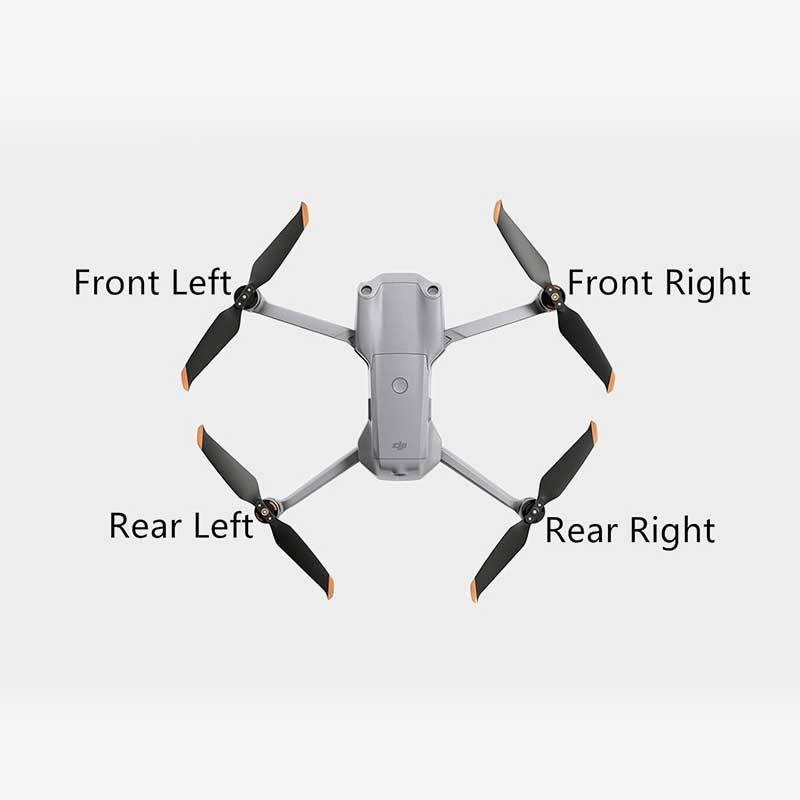
- Precise Fit – Perfectly molded for rear left mounting
- Installation Needs – Soldering required; basic repair skills recommended
- Functionality Restored – Regains balance and motor performance
- Genuine Component – Official DJI replacement part

Need Help? Chat with an Expert
- 9891098328
Free Shipping & Returns
Assured Quality
Online Support 24/7
Secure Payment
- Description
- Specification
- Reviews (0)
Description
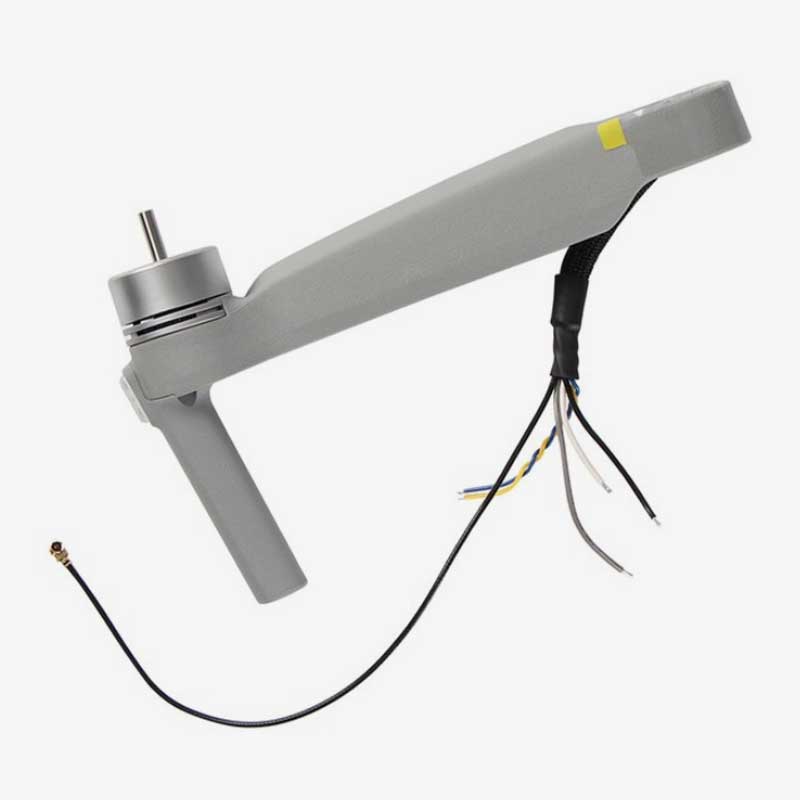
DJI Mavic Mini Rear Left Arm with Motor – The Back-End Hero of Smooth Flights
Your DJI Mavic Mini might be small, but it flies with big dreams—until that one innocent-looking branch or random rooftop turns into a crash course in gravity. And if the rear left arm takes the hit, your drone suddenly starts flying like a stubborn ceiling fan. Don’t worry—the DJI Mavic Mini Rear Left Arm with Motor is here to help your drone recover with style, balance, and zero awkward tilts. It’s the part that quietly holds things together but makes a loud impact when it’s gone. Time to fix it right and fly like a champ again.
Key Features of DJI Mavic Mini Rear Left Arm with Motor
1. Motor Already Installed – Just Plug and Power On
No need to hunt for tiny motors or play soldering surgeon—this arm comes fully loaded with a factory-installed motor. That means less hassle, more action. Simply unscrew the broken one, replace it with this beauty, and you’re halfway to liftoff. It’s like having a pre-cooked meal—just heat and eat. Except here, you screw and fly. Way less kitchen mess, way more fun.
2. OEM Fit That Slides in Like It Belongs
Forget jugaad, glue tricks, or force-fitting parts—this arm is made specifically for the Mavic Mini. Every cut, every curve, and every screw hole is in the right place, ready to slot in like it never left. Once installed, your drone will look so clean and symmetrical, you might even forget it was ever broken. It’s like giving your drone a prosthetic leg… but one that looks cooler and can fly.
3. Strong Plastic, Light Weight, and Crash-Resistant Attitude
Made from high-quality plastic that keeps your drone feather-light yet surprisingly tough—just what a flying machine needs. It’s resistant to small knocks, wind tantrums, and even your clumsy landings. The material knows its job: fly high, take hits, and stay loyal. It’s like your drone’s bodyguard—but one that doesn’t wear sunglasses or charge hourly.
4. Smooth and Balanced Motor for Stable Air Acrobatics
This isn’t just an arm—it’s a perfectly balanced piece of engineering with a buttery smooth motor that spins like a dream. It helps your drone maintain stable, shake-free flight even during fast turns or sudden moves. When one arm works harder than the rest, your drone flies like it’s dancing bhangra on one leg. This part ensures everything stays in sync—graceful, elegant, and steady as ever.
5. Pre-Routed Wiring for Quick and Clean Installation
The internal wiring is already placed where it should be—no spaghetti wires or electrical puzzles to solve. Just connect the cables with a calm hand, and you’re done. No engineering degree required, just some common sense and maybe a YouTube tutorial. This saves you time, confusion, and that awkward moment when you’re staring at wires like they’re alien code.
How to Clean the DJI Mavic Mini Rear Left Arm with Motor
-
Blow Away the Dust Bunnies – Use a bulb blower or short bursts of compressed air to remove loose dust and debris. This rear arm may not be in the spotlight, but it does a lot of heavy lifting—keep it clean and functioning.
-
Wipe It Down Properly – Use a soft microfiber cloth to gently clean the surface of the arm and motor. Avoid pressing too hard—this isn’t a kitchen counter, and scratches aren’t cool here.
-
Tidy Up the Motor Base – Dampen a cotton swab with isopropyl alcohol and gently clean around the motor’s edges. This removes hidden dirt without risking damage to the motor’s components.
-
Clean the Hinge Area – Use a fine brush to sweep out particles from the folding joint. Dirt buildup can cause stiffness or hinder the smooth movement of the arm over time.
-
Let It Air-Dry Naturally – Once cleaned, let everything air-dry completely before folding or storing. Moisture and electronics are not friends, so never rush the drying process.
How to Take Care of the DJI Mavic Mini Rear Left Arm with Motor
-
Handle with Care – When folding or unfolding the arm, do it gently and with patience. Snapping or forcing it can strain the hinge or motor wires and reduce its life.
-
Inspect for Looseness – Occasionally check the motor by gently rotating it and feeling for play or vibration. If something feels off, tighten the screws or consider servicing.
-
Avoid Wire Stress – Be mindful of the motor wires while cleaning or folding. Any tug, twist, or pull can damage these small but essential connections.
-
Don’t Overheat It – After a long flight, let the motor cool before handling. Touching it while hot can be risky, and operating it constantly without rest can cause wear over time.
-
Store It in a Safe Space – Always use a padded case for transport. The arm with the motor deserves a secure, cushioned spot to avoid pressure or misalignment.
Dos & Don’ts
Do’s
✔ Check the arm’s hinge and motor for signs of wear after each flight
✔ Gently test motor rotation before and after use
✔ Use proper tools and soft cloths during cleaning
✔ Let it cool between flights for better performance
✔ Store in a dust-free, dry environment
Don’ts
✖ Don’t use water or harsh chemicals on the motor
✖ Don’t pull or twist the wires connected to the motor
✖ Don’t fold the arm too quickly or with force
✖ Don’t leave the drone exposed to dirt or sunlight for long periods
✖ Don’t ignore strange sounds coming from the motor—it’s never a good sign
Safety Tips
-
Pre-Flight Motor Check – Spin the motor gently by hand before each flight to ensure it rotates freely. Resistance or roughness may mean it needs a quick clean.
-
Watch the Temperature – After flying, feel the motor casing. If it’s too hot to touch, give it a break before the next flight to prevent long-term damage.
-
Avoid Messy Terrain – Don’t take off or land on muddy, sandy, or grassy surfaces. Particles can sneak into the motor and mess with its balance.
-
Listen for Odd Noises – Any strange clicks, buzzes, or hums from the rear motor should be taken seriously. It’s better to fix it on the ground than mid-air.
-
Track Any Replacements – If you replace the motor or arm, label or document it. Mixing up motor orientations or using incompatible parts can affect flight performance.
Conclusion
The DJI Mavic Mini Rear Left Arm with Motor is the secret ingredient to your drone’s comeback story. It’s built for perfect fit, powerful flight, and painless installation. Whether you’re a newbie pilot or a crash survivor, this replacement arm will get you back in the air with confidence and class. So don’t let a broken limb keep your drone grounded—order now and send your Mavic Mini soaring once again!
Specifications of DJI Mavic Mini Rear Left Arm with Motor
| Category | Specifications |
|---|---|
| General | |
| Product Name | DJI Mavic Mini Rear Left Arm with Motor |
| Compatibility | DJI Mavic Mini |
| Material | High-quality plastic and metal |
| Weight | Approximately 15 grams |
| Dimensions | Engineered to fit the rear left section of the drone body |
| Design & Build | |
| Motor Type | Pre-installed brushless motor |
| Rotation Direction | Clockwise (CW) |
| Color | Light grey – consistent with the drone’s original finish |
| Structural Design | Built for reliability during flight |
| Installation | |
| Installation Process | Requires soldering and technical assembly |
| Mounting Precision | Aligns accurately with the drone’s frame and screw points |
| Performance | |
| Intended Use | Replaces broken or worn-out rear left motor arm |
| Effect on Flight | Restores proper lift and maneuverability |
| Additional Info | |
| Manufacturer | DJI |
| Product Type | Replacement rear left motor arm |
| Package Contents | 1 × Rear Left Arm with pre-installed motor |
Be the first to review “DJI Mavic Mini Rear Left Arm with Motor” Cancel reply
Overview
DJI Mavic Mini Rear Left Arm with Motor – The Back-End Hero of Smooth Flights
Your DJI Mavic Mini might be small, but it flies with big dreams—until that one innocent-looking branch or random rooftop turns into a crash course in gravity. And if the rear left arm takes the hit, your drone suddenly starts flying like a stubborn ceiling fan. Don’t worry—the DJI Mavic Mini Rear Left Arm with Motor is here to help your drone recover with style, balance, and zero awkward tilts. It’s the part that quietly holds things together but makes a loud impact when it’s gone. Time to fix it right and fly like a champ again.
Key Features of DJI Mavic Mini Rear Left Arm with Motor
1. Motor Already Installed – Just Plug and Power On
No need to hunt for tiny motors or play soldering surgeon—this arm comes fully loaded with a factory-installed motor. That means less hassle, more action. Simply unscrew the broken one, replace it with this beauty, and you’re halfway to liftoff. It’s like having a pre-cooked meal—just heat and eat. Except here, you screw and fly. Way less kitchen mess, way more fun.
2. OEM Fit That Slides in Like It Belongs
Forget jugaad, glue tricks, or force-fitting parts—this arm is made specifically for the Mavic Mini. Every cut, every curve, and every screw hole is in the right place, ready to slot in like it never left. Once installed, your drone will look so clean and symmetrical, you might even forget it was ever broken. It’s like giving your drone a prosthetic leg… but one that looks cooler and can fly.
3. Strong Plastic, Light Weight, and Crash-Resistant Attitude
Made from high-quality plastic that keeps your drone feather-light yet surprisingly tough—just what a flying machine needs. It’s resistant to small knocks, wind tantrums, and even your clumsy landings. The material knows its job: fly high, take hits, and stay loyal. It’s like your drone’s bodyguard—but one that doesn’t wear sunglasses or charge hourly.
4. Smooth and Balanced Motor for Stable Air Acrobatics
This isn’t just an arm—it’s a perfectly balanced piece of engineering with a buttery smooth motor that spins like a dream. It helps your drone maintain stable, shake-free flight even during fast turns or sudden moves. When one arm works harder than the rest, your drone flies like it’s dancing bhangra on one leg. This part ensures everything stays in sync—graceful, elegant, and steady as ever.
5. Pre-Routed Wiring for Quick and Clean Installation
The internal wiring is already placed where it should be—no spaghetti wires or electrical puzzles to solve. Just connect the cables with a calm hand, and you’re done. No engineering degree required, just some common sense and maybe a YouTube tutorial. This saves you time, confusion, and that awkward moment when you’re staring at wires like they’re alien code.
How to Clean the DJI Mavic Mini Rear Left Arm with Motor
-
Blow Away the Dust Bunnies – Use a bulb blower or short bursts of compressed air to remove loose dust and debris. This rear arm may not be in the spotlight, but it does a lot of heavy lifting—keep it clean and functioning.
-
Wipe It Down Properly – Use a soft microfiber cloth to gently clean the surface of the arm and motor. Avoid pressing too hard—this isn’t a kitchen counter, and scratches aren’t cool here.
-
Tidy Up the Motor Base – Dampen a cotton swab with isopropyl alcohol and gently clean around the motor’s edges. This removes hidden dirt without risking damage to the motor’s components.
-
Clean the Hinge Area – Use a fine brush to sweep out particles from the folding joint. Dirt buildup can cause stiffness or hinder the smooth movement of the arm over time.
-
Let It Air-Dry Naturally – Once cleaned, let everything air-dry completely before folding or storing. Moisture and electronics are not friends, so never rush the drying process.
How to Take Care of the DJI Mavic Mini Rear Left Arm with Motor
-
Handle with Care – When folding or unfolding the arm, do it gently and with patience. Snapping or forcing it can strain the hinge or motor wires and reduce its life.
-
Inspect for Looseness – Occasionally check the motor by gently rotating it and feeling for play or vibration. If something feels off, tighten the screws or consider servicing.
-
Avoid Wire Stress – Be mindful of the motor wires while cleaning or folding. Any tug, twist, or pull can damage these small but essential connections.
-
Don’t Overheat It – After a long flight, let the motor cool before handling. Touching it while hot can be risky, and operating it constantly without rest can cause wear over time.
-
Store It in a Safe Space – Always use a padded case for transport. The arm with the motor deserves a secure, cushioned spot to avoid pressure or misalignment.
Dos & Don’ts
Do’s
✔ Check the arm’s hinge and motor for signs of wear after each flight
✔ Gently test motor rotation before and after use
✔ Use proper tools and soft cloths during cleaning
✔ Let it cool between flights for better performance
✔ Store in a dust-free, dry environment
Don’ts
✖ Don’t use water or harsh chemicals on the motor
✖ Don’t pull or twist the wires connected to the motor
✖ Don’t fold the arm too quickly or with force
✖ Don’t leave the drone exposed to dirt or sunlight for long periods
✖ Don’t ignore strange sounds coming from the motor—it’s never a good sign
Safety Tips
-
Pre-Flight Motor Check – Spin the motor gently by hand before each flight to ensure it rotates freely. Resistance or roughness may mean it needs a quick clean.
-
Watch the Temperature – After flying, feel the motor casing. If it’s too hot to touch, give it a break before the next flight to prevent long-term damage.
-
Avoid Messy Terrain – Don’t take off or land on muddy, sandy, or grassy surfaces. Particles can sneak into the motor and mess with its balance.
-
Listen for Odd Noises – Any strange clicks, buzzes, or hums from the rear motor should be taken seriously. It’s better to fix it on the ground than mid-air.
-
Track Any Replacements – If you replace the motor or arm, label or document it. Mixing up motor orientations or using incompatible parts can affect flight performance.
Conclusion
The DJI Mavic Mini Rear Left Arm with Motor is the secret ingredient to your drone’s comeback story. It’s built for perfect fit, powerful flight, and painless installation. Whether you’re a newbie pilot or a crash survivor, this replacement arm will get you back in the air with confidence and class. So don’t let a broken limb keep your drone grounded—order now and send your Mavic Mini soaring once again!
Details
| specifications |
|---|
Reviews
There are no reviews yet.


Reviews
There are no reviews yet.