


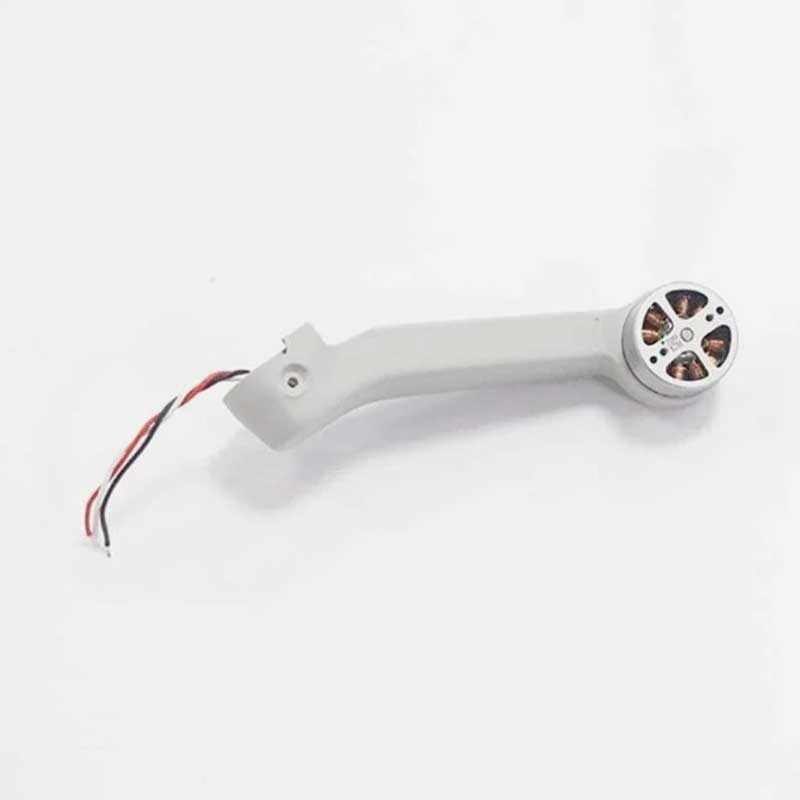
DJI Mavic Mini Front Left Arm
₹3,800.00 Original price was: ₹3,800.00.₹3,499.00Current price is: ₹3,499.00. inc. Gst
- Drone Compatibility – Specifically designed for DJI Mavic Mini
- Material Composition – Durable plastic with metal motor components
- Lightweight Design – Approximate weight: 15 grams
- Accurate Dimensions – Optimized to fit original arm slot
- Motor Type – Comes with pre-installed brushless motor
- Rotation Direction – Clockwise (CW) motor orientation
- Color Match – Blends seamlessly with the original Mavic Mini look
- Installation Method – Technical expertise required for installation
- Restores Performance – Supports flight stability and motor power
- Original Replacement – Genuine DJI spare part for best compatibility

Need Help? Chat with an Expert
- 9891098328
Free Shipping & Returns
Assured Quality
Online Support 24/7
Secure Payment
- Description
- Specification
- Reviews (0)
Description
DJI Mavic Mini Front Left Arm – The Unsung Hero of Smooth Takeoffs
Let’s face it—your DJI Mavic Mini doesn’t just rely on good looks and fancy GPS. It flies because each tiny limb does its job with military discipline. But when the front left arm gives up on life—thanks to a crash, a tree branch, or an overconfident pilot—it’s like trying to fly with a limp handshake. The DJI Mavic Mini Front Left Arm swoops in like a loyal sidekick to rescue your aerial dreams. With precise design, solid wiring, and zero drama, this replacement arm restores balance and elegance so your drone can rise again like a phoenix with propellers.
Key Features Of the DJI Mavic Mini Front Left Arm
1. Pre-Mounted Motor Means Zero Headache During Installation
The DJI Mavic Mini Front Left Arm isn’t just a piece of plastic with dreams—it comes with the motor already mounted, saving you the trouble of soldering wires like a mad scientist. It’s a plug-and-play situation, where the only sparks flying will be the excitement in your eyes, not from a burnt motherboard. Whether you’re a pro techie or a first-time fixer-upper, this arm makes installation so smooth you’ll wonder why all repairs aren’t this drama-free.
2. Engineered to Blend In Like a Ninja in a Grey Hoodie
There’s no need to worry about mismatched parts or awkward fittings that make your drone look like it’s been stitched together by Frankenstein. This arm is built to match the original DJI Mavic Mini’s design perfectly, down to the curves and screw placements. Once attached, it sits so flush and seamless, it’s as if it’s been there since day one—minus the crash trauma, of course.
3. Strong Enough to Take a Hit, But Smart Enough to Dodge One
Don’t let the small size fool you—this arm has the strength of a yoga master and the flexibility of a gymnast. Built from high-grade materials that can absorb shocks better than your last break-up, it’s designed to withstand real-world flying conditions. From mild bumps to not-so-mild crashes, this arm is ready to keep going like a champ without asking for sympathy.
4. Wired for Action, Tuned for Smooth Performance
Inside this sleek arm are motor wires that connect like butter and transmit power faster than your brain processes regret after a crash. The internal wiring is perfectly laid out for optimal signal flow and smooth operation, so your motor doesn’t hesitate mid-flight or act like it’s thinking about early retirement. Your drone will thank you with smoother flights and tighter turns.
5. Brings Back That Balanced Flight You Miss So Much
If your drone has been swaying like it’s dancing at a baraat, chances are your front left arm’s not pulling its weight. This replacement part restores the equilibrium your Mini needs to hover like a zen monk on a yoga mat. Once installed, the aircraft feels instantly more controlled, more responsive, and less like a confused butterfly in a storm.
How to Clean the DJI Mavic Mini Front Left Arm
-
Dust Off the Day’s Work – Use a soft anti-static brush or air blower to gently clean the arm from dust, sand, or any post-flight debris. This little limb does a lot of heavy lifting, so it deserves a gentle dust massage now and then.
-
Wipe with Care – Lightly dampen a microfiber cloth with isopropyl alcohol (not water!) and gently clean the surface of the arm. Focus especially on the area near the motor where oil or residue can build up.
-
Motor Gap Magic – The motor head area tends to collect fine particles. Use a cotton swab dipped in alcohol to clean around the motor base and edges of the arm without pressing too hard.
-
Connector Zone Watch – If your arm includes wire connectors or LED points, be extra cautious. Use only dry tools around these spots and never let moisture go near them.
-
Final Check and Drying – Finish with a dry, clean microfiber cloth and let the arm breathe for a few minutes before flying again or storing the drone. Think of it as a post-cleaning cooldown session.
How to Take Care of the DJI Mavic Mini Front Left Arm
-
No Twisting Olympics – The front arms are foldable but not bendable. Always fold and unfold gently, following the original direction. Forcing it backwards will lead to permanent regret (and a limp drone).
-
Monitor for Micro-Cracks – After every rough landing or unintentional tap against the wall, inspect the arm closely. Small cracks often hide near the fold or motor base and can turn into big trouble mid-flight.
-
Keep It Cool – Avoid flying in extreme heat. Motors heat up fast, and if the arm is already stressed or cracked, the combo can lead to a sudden “left turn only” situation mid-air.
-
Avoid Backpack Pressure – If storing the drone in a bag, make sure the arms aren’t pressed awkwardly. Pressure on the folded arm can lead to long-term bending or looseness in the joint.
-
Use Original Screws & Mounts – If replacing the arm, don’t reuse worn screws or force-fit components. An unbalanced or shaky arm will affect flight stability and confuse the drone’s sensors.
Dos & Don’ts
Do’s
✔ Clean the arm regularly, especially after flying in dusty or sandy areas
✔ Fold and unfold it only in the correct direction
✔ Inspect after every rough landing or minor collision
✔ Use only original parts and screws when replacing
✔ Store the drone with the arms folded in a padded case
Don’ts
✖ Don’t pull or twist the arm beyond its intended motion
✖ Don’t use water or soap to clean the motor or the folding joint
✖ Don’t fly with a cracked or loose arm—it’s not worth the crash
✖ Don’t carry the drone by holding just one arm (yes, people do that)
✖ Don’t ignore any vibration or tilt in flight—it could be an arm warning
Safety Tips
-
Pre-Flight Arm Inspection – Before every flight, gently test the arm’s tightness and folding motion. If it feels too loose or too stiff, it might be time for a replacement.
-
Motor Movement Check – Spin the motor on the front left arm lightly with your fingers before flight. It should move smoothly without any resistance or grinding.
-
Avoid Side Impacts – During takeoff and landing, ensure the drone is clear from bushes, fences, or human legs. A side bump can damage the arm more than a crash from 10 feet.
-
Don’t Overload Accessories – If you’re adding arm-mounted lights or reflectors, make sure they’re ultra-lightweight. Extra weight on one arm can ruin your drone’s balance.
-
Fly Balanced, Land Smooth – Uneven landings can stress specific arms more than others. Try to land evenly and avoid catching the arm in grass or pebbles that might pull it backward.
Conclusion
The DJI Mavic Mini Front Left Arm is your drone’s second chance at flight greatness. It’s reliable, precise, and surprisingly easy to install, even for someone whose idea of repair is “switch it off and on again.” So stop watching your drone sulk on the shelf and give it the replacement it deserves. Order now and let your drone fly like it never knew defeat!
Specifications Of DJI Mavic Mini Front Left Arm
| Category | Specifications |
|---|---|
| General | |
| Product Name | DJI Mavic Mini Front Left Arm |
| Compatibility | DJI Mavic Mini |
| Material | High-quality plastic and metal |
| Weight | Approximately 15 grams |
| Dimensions | Optimized to fit Mavic Mini’s front left motor arm slot |
| Design & Build | |
| Motor Type | Pre-installed brushless motor |
| Rotation Direction | Clockwise (CW) |
| Color | Light gray – matches original drone design |
| Build Quality | Designed to withstand flight vibrations and wear |
| Installation | |
| Installation Method | Requires soldering and technical expertise |
| Mounting Points | Precision-aligned with drone chassis |
| Performance | |
| Functional Purpose | Controls propeller rotation and supports stable flight |
| Replacement Use | Ideal for damaged or non-functional front arms |
| Additional Info | |
| Manufacturer | DJI |
| Product Type | Replacement drone motor arm |
| Package Contents | 1 × Front Left Arm with pre-installed motor |
Be the first to review “DJI Mavic Mini Front Left Arm” Cancel reply
Overview
DJI Mavic Mini Front Left Arm – The Unsung Hero of Smooth Takeoffs
Let’s face it—your DJI Mavic Mini doesn’t just rely on good looks and fancy GPS. It flies because each tiny limb does its job with military discipline. But when the front left arm gives up on life—thanks to a crash, a tree branch, or an overconfident pilot—it’s like trying to fly with a limp handshake. The DJI Mavic Mini Front Left Arm swoops in like a loyal sidekick to rescue your aerial dreams. With precise design, solid wiring, and zero drama, this replacement arm restores balance and elegance so your drone can rise again like a phoenix with propellers.
Key Features Of the DJI Mavic Mini Front Left Arm
1. Pre-Mounted Motor Means Zero Headache During Installation
The DJI Mavic Mini Front Left Arm isn’t just a piece of plastic with dreams—it comes with the motor already mounted, saving you the trouble of soldering wires like a mad scientist. It’s a plug-and-play situation, where the only sparks flying will be the excitement in your eyes, not from a burnt motherboard. Whether you’re a pro techie or a first-time fixer-upper, this arm makes installation so smooth you’ll wonder why all repairs aren’t this drama-free.
2. Engineered to Blend In Like a Ninja in a Grey Hoodie
There’s no need to worry about mismatched parts or awkward fittings that make your drone look like it’s been stitched together by Frankenstein. This arm is built to match the original DJI Mavic Mini’s design perfectly, down to the curves and screw placements. Once attached, it sits so flush and seamless, it’s as if it’s been there since day one—minus the crash trauma, of course.
3. Strong Enough to Take a Hit, But Smart Enough to Dodge One
Don’t let the small size fool you—this arm has the strength of a yoga master and the flexibility of a gymnast. Built from high-grade materials that can absorb shocks better than your last break-up, it’s designed to withstand real-world flying conditions. From mild bumps to not-so-mild crashes, this arm is ready to keep going like a champ without asking for sympathy.
4. Wired for Action, Tuned for Smooth Performance
Inside this sleek arm are motor wires that connect like butter and transmit power faster than your brain processes regret after a crash. The internal wiring is perfectly laid out for optimal signal flow and smooth operation, so your motor doesn’t hesitate mid-flight or act like it’s thinking about early retirement. Your drone will thank you with smoother flights and tighter turns.
5. Brings Back That Balanced Flight You Miss So Much
If your drone has been swaying like it’s dancing at a baraat, chances are your front left arm’s not pulling its weight. This replacement part restores the equilibrium your Mini needs to hover like a zen monk on a yoga mat. Once installed, the aircraft feels instantly more controlled, more responsive, and less like a confused butterfly in a storm.
How to Clean the DJI Mavic Mini Front Left Arm
-
Dust Off the Day’s Work – Use a soft anti-static brush or air blower to gently clean the arm from dust, sand, or any post-flight debris. This little limb does a lot of heavy lifting, so it deserves a gentle dust massage now and then.
-
Wipe with Care – Lightly dampen a microfiber cloth with isopropyl alcohol (not water!) and gently clean the surface of the arm. Focus especially on the area near the motor where oil or residue can build up.
-
Motor Gap Magic – The motor head area tends to collect fine particles. Use a cotton swab dipped in alcohol to clean around the motor base and edges of the arm without pressing too hard.
-
Connector Zone Watch – If your arm includes wire connectors or LED points, be extra cautious. Use only dry tools around these spots and never let moisture go near them.
-
Final Check and Drying – Finish with a dry, clean microfiber cloth and let the arm breathe for a few minutes before flying again or storing the drone. Think of it as a post-cleaning cooldown session.
How to Take Care of the DJI Mavic Mini Front Left Arm
-
No Twisting Olympics – The front arms are foldable but not bendable. Always fold and unfold gently, following the original direction. Forcing it backwards will lead to permanent regret (and a limp drone).
-
Monitor for Micro-Cracks – After every rough landing or unintentional tap against the wall, inspect the arm closely. Small cracks often hide near the fold or motor base and can turn into big trouble mid-flight.
-
Keep It Cool – Avoid flying in extreme heat. Motors heat up fast, and if the arm is already stressed or cracked, the combo can lead to a sudden “left turn only” situation mid-air.
-
Avoid Backpack Pressure – If storing the drone in a bag, make sure the arms aren’t pressed awkwardly. Pressure on the folded arm can lead to long-term bending or looseness in the joint.
-
Use Original Screws & Mounts – If replacing the arm, don’t reuse worn screws or force-fit components. An unbalanced or shaky arm will affect flight stability and confuse the drone’s sensors.
Dos & Don’ts
Do’s
✔ Clean the arm regularly, especially after flying in dusty or sandy areas
✔ Fold and unfold it only in the correct direction
✔ Inspect after every rough landing or minor collision
✔ Use only original parts and screws when replacing
✔ Store the drone with the arms folded in a padded case
Don’ts
✖ Don’t pull or twist the arm beyond its intended motion
✖ Don’t use water or soap to clean the motor or the folding joint
✖ Don’t fly with a cracked or loose arm—it’s not worth the crash
✖ Don’t carry the drone by holding just one arm (yes, people do that)
✖ Don’t ignore any vibration or tilt in flight—it could be an arm warning
Safety Tips
-
Pre-Flight Arm Inspection – Before every flight, gently test the arm’s tightness and folding motion. If it feels too loose or too stiff, it might be time for a replacement.
-
Motor Movement Check – Spin the motor on the front left arm lightly with your fingers before flight. It should move smoothly without any resistance or grinding.
-
Avoid Side Impacts – During takeoff and landing, ensure the drone is clear from bushes, fences, or human legs. A side bump can damage the arm more than a crash from 10 feet.
-
Don’t Overload Accessories – If you’re adding arm-mounted lights or reflectors, make sure they’re ultra-lightweight. Extra weight on one arm can ruin your drone’s balance.
-
Fly Balanced, Land Smooth – Uneven landings can stress specific arms more than others. Try to land evenly and avoid catching the arm in grass or pebbles that might pull it backward.
Conclusion
The DJI Mavic Mini Front Left Arm is your drone’s second chance at flight greatness. It’s reliable, precise, and surprisingly easy to install, even for someone whose idea of repair is “switch it off and on again.” So stop watching your drone sulk on the shelf and give it the replacement it deserves. Order now and let your drone fly like it never knew defeat!
Details
| specifications |
|---|
Reviews
There are no reviews yet.


Reviews
There are no reviews yet.