


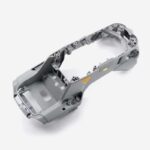
DJI Air 2S Lower Body Shell
₹5,499.00 Original price was: ₹5,499.00.₹4,999.00Current price is: ₹4,999.00. inc. Gst
- Drone Compatibility – Designed for DJI Air 2S
- Component Type – Lower body frame housing
- Material – High-strength plastic composite
- Color – Factory matte grey finish
- Precision Fit – OEM-grade alignment for internal parts
- Mounting Points – Built-in screw and port placements
- Cooling Support – Integrated vent design
- Port Cutouts – Accurate USB, sensor, and battery slots
- Repair Use – Ideal for damaged shell replacement
- Installation – Requires professional-level assembly

Need Help? Chat with an Expert
- 9891098328
Free Shipping & Returns
Assured Quality
Online Support 24/7
Secure Payment
- Description
- Specification
- Reviews (0)
Description
DJI Air 2S Lower Body Shell – The Underrated Armor That Holds It All Together
When your drone takes to the skies with grace and confidence, you rarely think about the unsung hero holding it all together—the lower body shell. This part doesn’t fly, doesn’t record, and doesn’t beep when things go wrong. But take it away, and your drone is just a pile of delicate parts lying on the floor like a tech puzzle. The DJI Air 2S Lower Body Shell is not just the base—it’s the foundation, the structure, the armor that supports every flight-critical component. Whether you’ve had a hard landing or a repair mission has gone sideways, this shell is the solid base your drone deserves to return to glory.
Key Features Of the DJI Air 2S Lower Body Shell
1. Designed Precisely for DJI Air 2S – No Gaps, No Wobbles, Just a Factory-Fit Finish
This lower body shell is not a generic clone or one-size-fits-all option—it’s built specifically and precisely for the DJI Air 2S. Every screw hole, every curve, every clip point is molded to fit exactly as it does in the factory version. That means your drone doesn’t end up with awkward gaps, misaligned arms, or panels that creak like old furniture. Once installed, it gives your drone the same snug, seamless structure it had on day one, holding all internal components with factory-level precision. It’s like giving your drone a second chance at being brand new—without needing to buy a whole new body.
2. Structural Backbone of the Drone – Where Stability, Strength, and Flight Begin
The lower shell isn’t just a cover—it’s the main structural component that holds everything from the flight controller to the ESC boards in perfect position. This is the piece that takes on all the pressure, from motor vibrations to landing shocks, and keeps every wire and circuit tucked safely in place. A damaged or cracked lower shell can lead to internal misalignments, increased vibration, and loose connections that compromise your drone’s stability and safety mid-flight. Replacing it ensures your drone’s spine is strong again, giving your bird the solid support it needs to handle both smooth glides and tough touchdowns with ease.
3. Made from Durable, Lightweight Material – Because Tough Doesn’t Mean Heavy
This shell is crafted from high-quality, impact-resistant plastic that’s strong enough to handle hard landings, random branch encounters, and workshop mishaps—yet light enough to not weigh down your drone’s flight time or agility. It’s engineered for strength without adding bulk, giving your Air 2S the protective base it needs while keeping it aerodynamic and nimble. Whether you’re filming on a windy mountaintop or performing precision maneuvers in tight spaces, this shell provides rugged protection without dragging your performance down.
4. Pre-Molded Mounting Points – Perfect Alignment for Every Tiny Component
Inside this lower shell, you’ll find all the mounting sockets, slots, and ridges you need to secure every internal part like it was designed by the drone gods. From the GPS unit and sensors to the IMU board and motor arms, everything clicks right back into place with minimal effort. There’s no guesswork, no forced fits, and definitely no wobbly internals. The pre-molded design ensures your drone’s internals are aligned to factory specifications, maintaining proper spacing, airflow, and connectivity for optimal performance. Even your drone’s cooling system gets its space just right, so you’re not just rebuilding—you’re restoring perfection.
5. Essential for Post-Crash Repairs – Don’t Let One Bad Landing Ruin Your Whole Rig
Had a rough landing? Tree branch surprise? High-speed tumble during a daring shoot? If your drone’s lower shell has taken the hit, it’s time for a replacement that restores not just the look, but the function and safety of your device. Cracks, dents, or stress marks in the original shell can lead to misaligned parts or worse—damage to expensive internal components. Installing this genuine-fit replacement ensures your drone gets back to its original strength and structure, so you can fly with peace of mind instead of duct tape and prayers. No more risky flights with cracked casing—give your drone the proper support it deserves.
How to Clean the Lower Body Shell
1. Wipe It Like You’re Polishing a Trophy, Not Scrubbing a Kettle
Start by using a clean, dry microfiber cloth to gently wipe off dust, fingerprints, and smudges from the surface. Don’t use bathroom towels or old t-shirts — we’re cleaning drone gear here, not buffing your bathroom sink. The shell deserves soft love, not fabric abuse.
2. Use a Soft Brush for the Nooks and Crannies (Not a Toothbrush from 2005)
Take a soft-bristled brush or a camera lens brush to reach the tighter grooves and edges where the cloth can’t reach. There’s usually some sneaky dust hiding in those corners like it’s playing hide and seek. Just don’t get aggressive — we want the dirt out, not the plastic scratched.
3. Skip the Soapy Adventure, Use Isopropyl Alcohol if Needed
If the shell has stubborn marks, oily fingerprints, or residue, you can use a slightly damp microfiber cloth with a bit of isopropyl alcohol (70% or less). Don’t pour the alcohol directly on the shell — it’s a drone part, not a cocktail. Gently dab and wipe, and the shell will be sparkling in no time.
4. Clean Around Screws and Ports with Patience, Not Pointy Tools
Use cotton swabs or small foam tips to clean around the screw holes, vent openings, or port edges. These spots are often ignored but can trap tiny debris. Never use sharp pins or knives — this is cleaning, not surgery.
5. Dry It Completely Before Reassembly or Flight
Once the shell is cleaned, leave it in a dry spot for at least 10 minutes to ensure no moisture is hiding in corners. You don’t want your freshly cleaned shell turning into a foggy sauna once the motors start running.
How to Take Care of the Lower Body Shell
1. Keep It Out of Sunlight Like It’s a Vampire
Extended exposure to direct sunlight can weaken the plastic over time, fade the color, or even cause warping. Store your drone in a shaded, cool place — not on your car dashboard or a rooftop bag in peak summer. UV rays and drones are not best friends.
2. Handle With Care During Landings and Repairs
Whether you’re landing manually or opening the shell for repairs, treat it gently. Hard landings or dropping tools on the shell can create small cracks that lead to bigger problems. Remember, it’s a drone body part, not a wrestling mat.
3. Avoid Over-Tightening Screws Like You’re Fixing a Door Hinge
When reassembling the drone, make sure not to overtighten the screws around the lower shell. Too much pressure can cause stress fractures or strip the threads. Just a firm, snug fit will do — no superhero strength needed here.
4. Protect It from Sharp Surfaces and Rough Bags
If you’re storing or transporting the drone, make sure it’s in a padded case. Don’t toss it into a backpack with keys, coins, or tools that can scratch or dent the shell. The lower shell protects internal components — it deserves some protection too.
5. Inspect It Regularly Like a Responsible Drone Parent
Every few flights, take a quick look at the lower shell for any cracks, bends, or missing screws. Catching damage early prevents bigger issues later. Think of it as a quick drone health check — no stethoscope required.
Dos & Don’ts
Do’s
✔ Clean the shell regularly with soft tools to avoid dirt buildup.
✔ Store the drone in a cool, dry place away from harsh environments.
✔ Use proper screwdrivers when removing or replacing the shell.
✔ Check for hairline cracks or warping after every rough landing.
✔ Replace damaged shells immediately to protect internal parts.
Don’ts
✖ Don’t use hot water, soap, or harsh chemicals on the plastic.
✖ Don’t leave the drone exposed to the sun or in a closed hot car.
✖ Don’t drag the shell across rough ground or stone surfaces.
✖ Don’t over-tighten screws while reinstalling the lower shell.
✖ Don’t fly if the lower shell is cracked or partially detached.
Safety Tips
1. Avoid Flying with a Damaged Shell Even If “It Looks Okay”
Cracks, dents, or loose parts on the lower shell can impact flight stability and expose internal components. Don’t risk it — replace the shell or fix the issue before taking off. Flying with broken armor is a one-way ticket to a crash.
2. Ensure Proper Fitment After Repairs or Cleaning
When putting the lower shell back in place, make sure every screw is properly tightened and aligned. A misaligned shell can affect airflow and create vibrations mid-flight. And trust me, your drone doesn’t enjoy mid-air shivers.
3. Keep Vents and Openings Free of Dust or Tape
Some users mistakenly tape over the shell’s vent holes to keep dust out. Big mistake. Those vents are for cooling — blocking them is like putting tape over your own nose. Keep them clean, but never covered.
4. Don’t Attempt DIY Fixes with Glue or Tape
If the shell has a minor crack, don’t try to patch it with superglue or tape. These materials can heat up and release fumes inside the drone or peel off mid-air. Replace the shell or get professional help if needed.
5. Use Only Compatible Parts and Screws
Always ensure the lower body shell you’re using is specifically designed for the DJI Air 2S. Using a shell from another model or incorrect screws may fit badly and compromise structural strength.
Time to Rebuild Right
The DJI Air 2S Lower Body Shell may not be flashy, but it’s one of the most important parts of your drone. It supports every mission, stabilizes every move, and holds every vital organ inside your flying machine. If yours is cracked, bent, or just plain tired, don’t risk your expensive internals flying with a broken foundation. Get the perfect-fit replacement and restore your drone’s strength, precision, and durability—because strong flights start with a strong base.
Upgrade your shell, rebuild with confidence, and let your DJI Air 2S rise like it just rolled off the assembly line.
Specifications Of DJI Air 2S Lower Body Shell
| Category | Specifications |
|---|---|
| General | |
| Product Name | DJI Air 2S Lower Body Shell |
| Compatibility | DJI Air 2S Drone |
| Product Type | Lower structural housing shell |
| Usage | Replacement part for damaged or worn lower housing |
| Material & Design | |
| Material | High-durability plastic polymer |
| Color | Matte grey (DJI original finish) |
| Surface Texture | Slightly textured for grip and aesthetics |
| Cooling Features | Includes integrated vent holes for airflow and heat dissipation |
| Structural Fit | |
| Precision Fitting | Exact match for internal board mounts and screw slots |
| Port Cutouts | Pre-aligned for battery connector, USB, sensors, and gimbal frame |
| Mounting Points | Reinforced internal standoffs and mounts for flight controller |
| Alignment Notches | Built-in ridges for seamless top/bottom shell fitting |
| Installation | |
| Tools Required | Precision screwdriver, spudger, tweezers |
| Assembly Difficulty | Intermediate to Advanced (drone disassembly required) |
| Repair Purpose | Replaces cracked, broken, or heat-damaged lower shells |
| Additional Info | |
| OEM Part | Yes, original DJI-compatible component |
| Package Includes | 1 × Lower Body Shell for DJI Air 2S |
Be the first to review “DJI Air 2S Lower Body Shell” Cancel reply
Overview
DJI Air 2S Lower Body Shell – The Underrated Armor That Holds It All Together
When your drone takes to the skies with grace and confidence, you rarely think about the unsung hero holding it all together—the lower body shell. This part doesn’t fly, doesn’t record, and doesn’t beep when things go wrong. But take it away, and your drone is just a pile of delicate parts lying on the floor like a tech puzzle. The DJI Air 2S Lower Body Shell is not just the base—it’s the foundation, the structure, the armor that supports every flight-critical component. Whether you’ve had a hard landing or a repair mission has gone sideways, this shell is the solid base your drone deserves to return to glory.
Key Features Of the DJI Air 2S Lower Body Shell
1. Designed Precisely for DJI Air 2S – No Gaps, No Wobbles, Just a Factory-Fit Finish
This lower body shell is not a generic clone or one-size-fits-all option—it’s built specifically and precisely for the DJI Air 2S. Every screw hole, every curve, every clip point is molded to fit exactly as it does in the factory version. That means your drone doesn’t end up with awkward gaps, misaligned arms, or panels that creak like old furniture. Once installed, it gives your drone the same snug, seamless structure it had on day one, holding all internal components with factory-level precision. It’s like giving your drone a second chance at being brand new—without needing to buy a whole new body.
2. Structural Backbone of the Drone – Where Stability, Strength, and Flight Begin
The lower shell isn’t just a cover—it’s the main structural component that holds everything from the flight controller to the ESC boards in perfect position. This is the piece that takes on all the pressure, from motor vibrations to landing shocks, and keeps every wire and circuit tucked safely in place. A damaged or cracked lower shell can lead to internal misalignments, increased vibration, and loose connections that compromise your drone’s stability and safety mid-flight. Replacing it ensures your drone’s spine is strong again, giving your bird the solid support it needs to handle both smooth glides and tough touchdowns with ease.
3. Made from Durable, Lightweight Material – Because Tough Doesn’t Mean Heavy
This shell is crafted from high-quality, impact-resistant plastic that’s strong enough to handle hard landings, random branch encounters, and workshop mishaps—yet light enough to not weigh down your drone’s flight time or agility. It’s engineered for strength without adding bulk, giving your Air 2S the protective base it needs while keeping it aerodynamic and nimble. Whether you’re filming on a windy mountaintop or performing precision maneuvers in tight spaces, this shell provides rugged protection without dragging your performance down.
4. Pre-Molded Mounting Points – Perfect Alignment for Every Tiny Component
Inside this lower shell, you’ll find all the mounting sockets, slots, and ridges you need to secure every internal part like it was designed by the drone gods. From the GPS unit and sensors to the IMU board and motor arms, everything clicks right back into place with minimal effort. There’s no guesswork, no forced fits, and definitely no wobbly internals. The pre-molded design ensures your drone’s internals are aligned to factory specifications, maintaining proper spacing, airflow, and connectivity for optimal performance. Even your drone’s cooling system gets its space just right, so you’re not just rebuilding—you’re restoring perfection.
5. Essential for Post-Crash Repairs – Don’t Let One Bad Landing Ruin Your Whole Rig
Had a rough landing? Tree branch surprise? High-speed tumble during a daring shoot? If your drone’s lower shell has taken the hit, it’s time for a replacement that restores not just the look, but the function and safety of your device. Cracks, dents, or stress marks in the original shell can lead to misaligned parts or worse—damage to expensive internal components. Installing this genuine-fit replacement ensures your drone gets back to its original strength and structure, so you can fly with peace of mind instead of duct tape and prayers. No more risky flights with cracked casing—give your drone the proper support it deserves.
How to Clean the Lower Body Shell
1. Wipe It Like You’re Polishing a Trophy, Not Scrubbing a Kettle
Start by using a clean, dry microfiber cloth to gently wipe off dust, fingerprints, and smudges from the surface. Don’t use bathroom towels or old t-shirts — we’re cleaning drone gear here, not buffing your bathroom sink. The shell deserves soft love, not fabric abuse.
2. Use a Soft Brush for the Nooks and Crannies (Not a Toothbrush from 2005)
Take a soft-bristled brush or a camera lens brush to reach the tighter grooves and edges where the cloth can’t reach. There’s usually some sneaky dust hiding in those corners like it’s playing hide and seek. Just don’t get aggressive — we want the dirt out, not the plastic scratched.
3. Skip the Soapy Adventure, Use Isopropyl Alcohol if Needed
If the shell has stubborn marks, oily fingerprints, or residue, you can use a slightly damp microfiber cloth with a bit of isopropyl alcohol (70% or less). Don’t pour the alcohol directly on the shell — it’s a drone part, not a cocktail. Gently dab and wipe, and the shell will be sparkling in no time.
4. Clean Around Screws and Ports with Patience, Not Pointy Tools
Use cotton swabs or small foam tips to clean around the screw holes, vent openings, or port edges. These spots are often ignored but can trap tiny debris. Never use sharp pins or knives — this is cleaning, not surgery.
5. Dry It Completely Before Reassembly or Flight
Once the shell is cleaned, leave it in a dry spot for at least 10 minutes to ensure no moisture is hiding in corners. You don’t want your freshly cleaned shell turning into a foggy sauna once the motors start running.
How to Take Care of the Lower Body Shell
1. Keep It Out of Sunlight Like It’s a Vampire
Extended exposure to direct sunlight can weaken the plastic over time, fade the color, or even cause warping. Store your drone in a shaded, cool place — not on your car dashboard or a rooftop bag in peak summer. UV rays and drones are not best friends.
2. Handle With Care During Landings and Repairs
Whether you’re landing manually or opening the shell for repairs, treat it gently. Hard landings or dropping tools on the shell can create small cracks that lead to bigger problems. Remember, it’s a drone body part, not a wrestling mat.
3. Avoid Over-Tightening Screws Like You’re Fixing a Door Hinge
When reassembling the drone, make sure not to overtighten the screws around the lower shell. Too much pressure can cause stress fractures or strip the threads. Just a firm, snug fit will do — no superhero strength needed here.
4. Protect It from Sharp Surfaces and Rough Bags
If you’re storing or transporting the drone, make sure it’s in a padded case. Don’t toss it into a backpack with keys, coins, or tools that can scratch or dent the shell. The lower shell protects internal components — it deserves some protection too.
5. Inspect It Regularly Like a Responsible Drone Parent
Every few flights, take a quick look at the lower shell for any cracks, bends, or missing screws. Catching damage early prevents bigger issues later. Think of it as a quick drone health check — no stethoscope required.
Dos & Don’ts
Do’s
✔ Clean the shell regularly with soft tools to avoid dirt buildup.
✔ Store the drone in a cool, dry place away from harsh environments.
✔ Use proper screwdrivers when removing or replacing the shell.
✔ Check for hairline cracks or warping after every rough landing.
✔ Replace damaged shells immediately to protect internal parts.
Don’ts
✖ Don’t use hot water, soap, or harsh chemicals on the plastic.
✖ Don’t leave the drone exposed to the sun or in a closed hot car.
✖ Don’t drag the shell across rough ground or stone surfaces.
✖ Don’t over-tighten screws while reinstalling the lower shell.
✖ Don’t fly if the lower shell is cracked or partially detached.
Safety Tips
1. Avoid Flying with a Damaged Shell Even If “It Looks Okay”
Cracks, dents, or loose parts on the lower shell can impact flight stability and expose internal components. Don’t risk it — replace the shell or fix the issue before taking off. Flying with broken armor is a one-way ticket to a crash.
2. Ensure Proper Fitment After Repairs or Cleaning
When putting the lower shell back in place, make sure every screw is properly tightened and aligned. A misaligned shell can affect airflow and create vibrations mid-flight. And trust me, your drone doesn’t enjoy mid-air shivers.
3. Keep Vents and Openings Free of Dust or Tape
Some users mistakenly tape over the shell’s vent holes to keep dust out. Big mistake. Those vents are for cooling — blocking them is like putting tape over your own nose. Keep them clean, but never covered.
4. Don’t Attempt DIY Fixes with Glue or Tape
If the shell has a minor crack, don’t try to patch it with superglue or tape. These materials can heat up and release fumes inside the drone or peel off mid-air. Replace the shell or get professional help if needed.
5. Use Only Compatible Parts and Screws
Always ensure the lower body shell you’re using is specifically designed for the DJI Air 2S. Using a shell from another model or incorrect screws may fit badly and compromise structural strength.
Time to Rebuild Right
The DJI Air 2S Lower Body Shell may not be flashy, but it’s one of the most important parts of your drone. It supports every mission, stabilizes every move, and holds every vital organ inside your flying machine. If yours is cracked, bent, or just plain tired, don’t risk your expensive internals flying with a broken foundation. Get the perfect-fit replacement and restore your drone’s strength, precision, and durability—because strong flights start with a strong base.
Upgrade your shell, rebuild with confidence, and let your DJI Air 2S rise like it just rolled off the assembly line.
Details
| specifications |
|---|

Reviews
There are no reviews yet.